

To ensure we deliver high quality printed product every job we print needs to have tick marks and bleed.
What is bleed?
Bleed is the area outside of the document size, if your printed material has either an image, graphic or background colour, then it needs to extend into this bleed area.
This ensures when your job is cut to the correct size your design will fill the whole page.

Problems can occur when design elements touch the edge of the page, a small shift of a few tenths of millimetres during the cutting process, can result in a small white edge. To avoid this the design needs to be extended design beyond the document size.

What are tick marks?
We guillotine all our printed materials according to the tick marks, which will correspond to the size of your document.
We can add tick marks in our Studio, however you do need to allow for 3mm bleed.
What is a safe area?
The next consideration is keeping any important text or images away from the edge of your document, which we call this the “Safe area”. We recommend at least 3mm inside of your document size, however 5mm or 10mm will give a better look to your finished job.

3 important box areas
To confirm you need to allow for the following 3 boxes
- Bleed Box – 3mm outside of your document size
- Trim Box – your document size
- Safe Box – 3mm inside of your document size
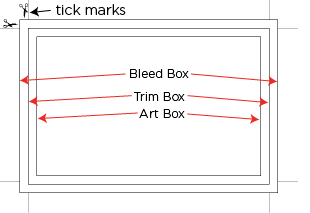
If you can work within these boundaries your finished product will look more professional.
How to apply these rules
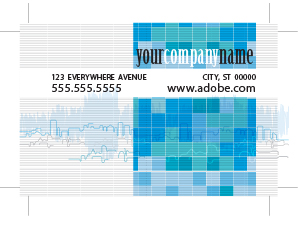
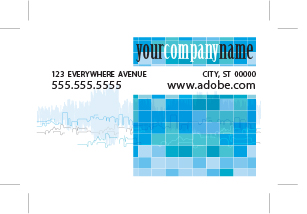
Here is an example of a business card, with the important information inside the Safe area (which is highlighted in light Blue).

This is how the document will actually look, prior to printing.
Whilst some applications will allow for a Bleed area to be specified during the initial document set up, such as InDesign, Illustrator etc, some do not. If your application or software doesn’t then consider changing your design so you don’t have any bleed and everything sits inside the safe area.
However if you do want your design to extend beyond the safe area, then we recommend you make the final document size 6mm larger, i.e. A4 which is 210 x 297mm, would be 216 x 303mm, as this allows for 3mm around all the edges. But remember to keep any important information in the safe area, which in the case of A4 would be at least 204 x 291mm, using Guides can often help with this.
Whilst we don’t recommend professionally printed jobs being created in Microsoft Word, you can create a document using a Custom Size, and then define a non-printable area, this will be your bleed area.
In Publisher you can specify a Page size, this will be the finished page size i.e. A4, and also a Paper size, this will include your 3mm bleed. You will then be able to extend any elements that will fit the paper size.
We can then add the tick marks when we print the job for you.